Accelerating XGBoost with GPU in R

TL;DR
Update NVIDIA drivers, install the pre-built {xgboost} library with GPU support, and set device = "cuda" while tree_method = "hist".
What is XGBoost?
XGBoost (Extreme Gradient Boosting) is a powerful machine learning library designed for efficient and scalable implementation of gradient boosting algorithms. It’s a perfect example of a cross-language library, available for Python, Julia, and R. Key features include parallel processing, handling missing values, and regularization to prevent overfitting. According to the developers, {xgboost} models have been used to win several Kaggle competitions!
However, the most interesting feature is that {xgboost} is one of the few R packages that supports GPU computing with R.
Installation instructions
According to the official documentation of the {xgboost} library, to run GPU-accelerated models in R, one must download and install the experimental pre-built binary with GPU support (i.e., not the CRAN version!). Currently, they exist only for Windows and Linux . They are not built with every release, so it’s a good practice to monitor GitHub’s release page for new binaries. While I am writing this post, the 2.0.3 version is the latest with GPU support for R.
Currently, only NVIDIA GPUs are supported. So, in a nutshell, prerequisites are as follows:
- Linux / or Windows machine
- NVIDIA videocard
Depending on your operating system, installation instructions may vary. While it is quite straightforward for Windows and Linux, running {xgboost} with GPU on WSL2 may require some additional steps.
No additional tinkering is required; just be sure that you have installed the latest NVIDIA drivers on your system.
Make sure that the NVIDIA drivers are up to date. I found NVCleaninstall extremely helpful and easy for updating drivers.

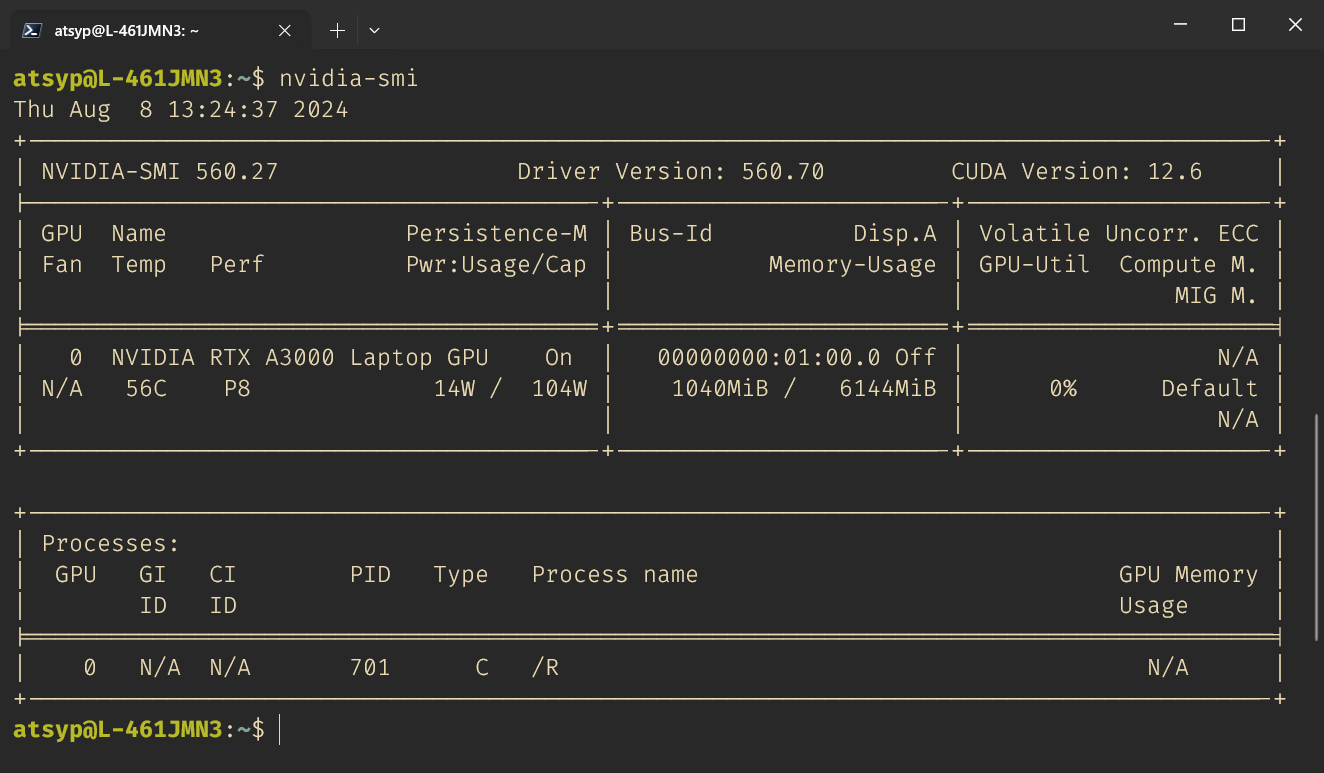
By default, WSL2 should have access to your GPU. You can check this by running nvidia-smi in your terminal. If you see something similar to this, you are all set:
If not, try installing CUDA Toolkit following this instructions:
One may also be interested in installing the CUDA Toolkit. This video is a step-by-step tutorial on how to install WSL and the CUDA Toolkit. Be aware that only Debian-based WSL distros are currently supported.
Via nix shell, created by Bruno Rodrigues.
Testing GPU support
Actually, the {xgboost} developers have a lot of demo scripts showing how to use the R package properly. Below, I am using a slightly updated gpu_accelerated.R as an example.
While there is some evidence that {tidymodels} can run {xgboost} on GPU, I failed to do so. I had the impression that the issue lies in the xgb.DMatrix class, which is required for {xgboost} to distribute computations on the GPU properly, but maybe I am wrong.
library(xgboost)
library(tictoc)
# Simulate N x p random matrix with some binomial response dependent on pp columns
set.seed(111)
N <- 1000000
p <- 50
pp <- 25
X <- matrix(runif(N * p), ncol = p)
betas <- 2 * runif(pp) - 1
sel <- sort(sample(p, pp))
m <- X[, sel] %*% betas - 1 + rnorm(N)
y <- rbinom(N, 1, plogis(m))
tr <- sample.int(N, N * 0.75)
dtrain <- xgb.DMatrix(X[tr, ], label = y[tr])
dtest <- xgb.DMatrix(X[-tr, ], label = y[-tr])
evals <- list(train = dtrain, test = dtest)
# Create parameter sets
param <- list(
objective = "reg:logistic",
eval_metric = "error",
eval_metric = "logloss",
max_depth = 2,
eta = 1
)The key thing is, that since {xgboost} v2.0.0 one have to use watchlist instead of evals and specify device parameter.
# Ordinary model
tic()
xgb_norm <- xgb.train(
params = param,
data = dtrain,
watchlist = evals,
nrounds = 100,
verbose = 0,
tree_method = "hist"
)
toc()6.67 sec elapsed# GPU model
tic()
xgb_gpu <- xgb.train(
params = param,
data = dtrain,
watchlist = evals,
nrounds = 100,
verbose = 0,
tree_method = "hist",
device = "cuda"
)
toc()1.35 sec elapsedThat is! I have a ≈6x speed increase while testing it on WSL2.
ggplot2 setup
library(ggplot2)
library(dplyr)
library(ggdist)
library(hrbrthemes)
library(showtext)
font_add_google("Ubuntu Condensed", "Ubuntu Condensed")
showtext_auto()
showtext_opts(dpi = 300)
theme_set(
hrbrthemes::theme_ft_rc(
axis = TRUE,
base_family = "Ubuntu Condensed",
base_size = 12,
axis_title_size = 10
) +
theme(
axis.text = element_text(color = "white"),
axis.title = element_text(color = "white"),
plot.title = element_text(color = "white"),
plot.subtitle = element_text(color = "white"),
plot.caption = element_text(color = "white"),
legend.text = element_text(color = "white"),
legend.title = element_text(color = "white")
)
)Benchmark code
library(bench)
gpu_benchs <-
bench::mark(
GPU = xgb.train(
params = param,
data = dtrain,
watchlist = evals,
nrounds = 100,
verbose = 0,
tree_method = "hist",
device = "cuda"
),
CPU = xgb.train(
params = param,
data = dtrain,
watchlist = evals,
nrounds = 100,
verbose = 0,
tree_method = "hist"
),
relative = FALSE,
check = FALSE,
iterations = 10L
)
tibble(
device = rep(c("GPU", "CPU"), each = length(gpu_benchs$time[[1]])),
time = unlist(gpu_benchs$time)
) |>
ggplot(aes(y = device, x = time)) +
stat_pointinterval(
aes(color = device),
show.legend = FALSE
) +
scale_color_manual(values = c("#dd1c05", "#ebcc2a")) +
scale_x_continuous(
breaks = scales::pretty_breaks(n = 6)
) +
labs(
x = "Time elapsed, sec",
y = "Device"
)
BONUS: Kaggle notebooks
The Kaggle kernel already comes equipped with the {xgboost} library from CRAN. Therefore, the pre-installed {xgboost} does not have GPU support. First, we need to initialize renv to isolate our notebook environment. Using renv is the easiest but not the fastest way to do this, as we will need to download and install all the other packages required for our modeling, which may take some time.
Apart from that, running GPU-accelerated models is not that different from a Linux server. Just don’t forget to set device="cuda", enable GPU T4×2 acceleration support, and have fun!
# Install {renv} package
install.packages("renv")
# Initialise {renv} environment
renv::init()
renv::activate()
# Install {xgboost} dependencies
renv::install(c("jsonlite", "data.table"))
# Install the {xgboost} package
xgboost_url <- "https://s3-us-west-2.amazonaws.com/xgboost-nightly-builds/release_2.0.0/xgboost_r_gpu_linux_82d846bbeb83c652a0b1dff0e3519e67569c4a3d.tar.gz"
install.packages(xgboost_url, repos = NULL, type = "source")Citation
@online{tsyplenkov2024,
  author = {Tsyplenkov, Anatoly},
  title = {Accelerating {XGBoost} with {GPU} in {R}},
  date = {2024-08-06},
  url = {https://anatolii.nz/posts/2024/xgboost-gpu-r.html},
  langid = {en}
}